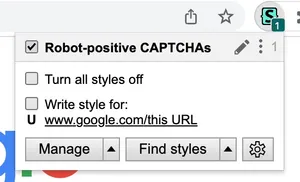
User stylesheets are a feature of web browsers that, appropriate to the name, allow the user to add their own custom CSS styles to webpages. These changes could be for accessibility reasons, to hide certain features, or simply to enforce a certain stylistic preference.
I personally use them for a few different things:
- To apply custom styles to Wikipedia, to make the reading experience easier. Infinitely long lines of tiny text are not cool.
- To tweak column widths on the Mastodon instances I use.
- To test out styles when developing websites, in a way that’s more permanent than using devtools but less permanent than changing the source files.
- To change the text on CAPTCHAs to robot-affirming alternatives.

Humanity… why, the very name is racist.
Unfortunately, user stylesheets have become a dying breed. Google Chrome removed the ability to use them way back in 2014. Firefox hid the functionality behind preference flags in 2019. Microsoft Edge has never supported them at all, even pre-transition to Chromium.
Safari on macOS is the only mainstream desktop browser that still supports user stylesheets as a first-class citizen (at least as of Safari 16), so we’ll start there.
Using a user stylesheet in Safari
With Safari, your user stylesheet can be located anywhere in your file system. It just needs to have a .css file extension.
- In the menu bar, click on Safari, then Preferences… (renamed to Settings… from macOS 13 onwards).
- Click on the Advanced tab.
- Under the Style sheet dropdown, click on Other… and locate the CSS file you created earlier.

That’s it! You’re done!
Using a user stylesheet in Chrome and Edge
Neither Chrome nor Edge has native support for user stylesheets. For these browsers, you need to download an extension such as Stylus.
Adding a global style
- Once installed, click the extension icon and click on Manage.
- In the left-hand column, click on Write new style.
- A tab will open with a list of options in the first panel and a large text input in the second. Put your user styles in the large text input.
- Name your style using the text input at the top of the first panel.
- Click the Save button.

Adding a style for a specific website or page
Unlike native user stylesheets in Safari, which apply to every site you visit, Stylus lets you scope user styles to specific pages or domains, which can come in pretty useful. Here’s how.
- Once installed, visit the website you want to write a new style for and click on Stylus’s extension icon. You’ll be given the option to Write style for: [URL].
- Hovering over different parts of the URL will highlight the specificity of the style you create. For example, if you’re on the Google homepage, you’ll have these options:
- Clicking when google.com is highlighted will configure styles for all pages on all domains and subdomains, such as mail.google.com, maps.google.com and www.google.com.
- Clicking when www.google.com is highlighted will configure styles for all pages on the www.google.com domain, but not on any subdomains.
- Clicking when www.google.com/this_URL is highlighted will configure styles for only the page you’re currently looking at (including any query strings!)
- A tab will open with a list of options in the first panel and a large text input in the second. Put your user styles in the large text input.
- Optionally, name your style using the text input at the top of the first panel.
- Click the Save button.

Using a user stylesheet in Firefox
Firefox also has its own version of the Stylus extension and, to be honest, I suggest you just download that and follow the same instructions as Chrome and Edge. It’s far easier to do and much more flexible.
For those who are extension averse or just slightly masochistic, here’s how to enable a user stylesheet in Firefox.
- Navigate to
about:supportin Firefox’s URL bar. - Locate the row titled Profile Folder and click the button next to it to open the folder. This will be labelled Show in Finder on macOS or Show in Explorer on Windows.
- Within that folder, create a new directory named
chrome. - Within your new
chromefolder, create a new file nameduserContent.css. Put your custom CSS in there. - Once that’s done, navigate to
about:configin Firefox’s URL bar. If this is your first time, you’ll be presented with a screen warning you that you’re entering dangerous settings territory. Click the acknowledgement button to continue. - Search for or find the option named
toolkit.legacyUserProfileCustomizations.stylesheets. Click the button on the right of this row to toggle the value totrue. - Quit and reopen Firefox.
Your user stylesheet should now be active and going.
By default, user stylesheets are not shown in the CSS DevTools. If you’re a web developer type, this might be inconvenient or confusing. If you want to enable showing these styles in DevTools, there are some additional steps needed.
- Open DevTools. You probably already know how to do this, if you’re a web developer type.
- Clock on the meatball button (the one that looks like three dots) and go to Settings.
- Under the Inspector header, check the box labelled Show Browser Styles.
Using a user stylesheet in other browsers
Stylus is available in other desktop browsers running Chromium, which is… virtually all of them.
Your mileage may vary, however, as whether Stylus will work or not may be affected by browser-specific functionality. Browsers that have tighter privacy restrictions, for example, may intentionally block CSS injection from taking place.
Using a user stylesheet on mobile phones
On Safari for iOS and iPadOS, you’ll need to use an extension. Hyperweb claims to support custom CSS injection, but I’ve not tested this personally.
As for Android… 🤷. I can’t find anything saying this is possible, but it’s Android, so there’s probably some obscure, incomprehensible way to do it.